Interface Tour
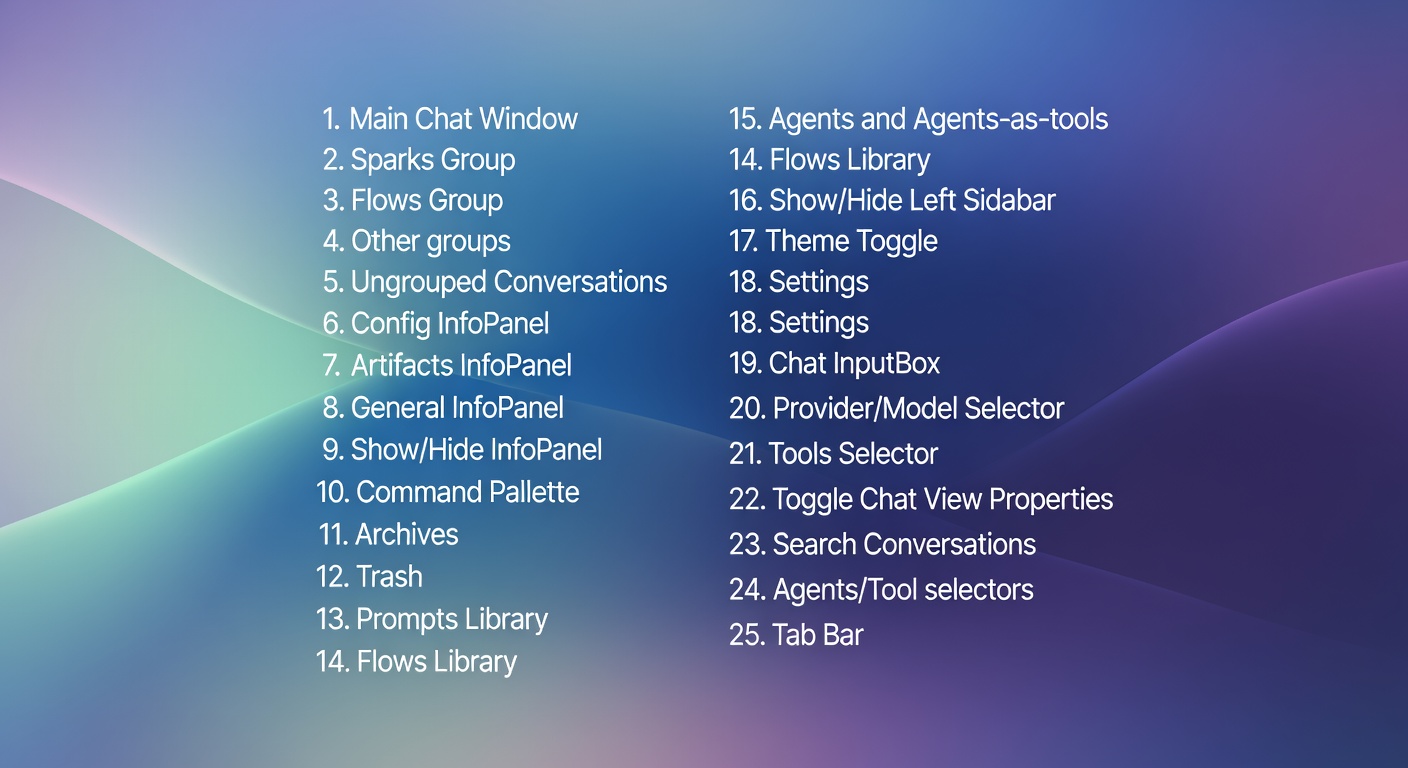
QARK’s interface has six regions: icon sidebar, content sidebar, tab bar, main panel, info panel, and the universal overlay.

Icon sidebar
Section titled “Icon sidebar”The narrow vertical strip on the far left. Each icon switches the content sidebar to a different view.
Top section (views):
| Icon | View | Shortcut |
|---|---|---|
| Conversations | Conversation list, groups, search | — |
| Archive | Archived conversations | Ctrl+Backspace / Cmd+Backspace |
| Trash | Deleted conversations with restore | — |
| Prompts | Prompt library with categories and favorites | Ctrl+Shift+P / Cmd+Shift+P |
| Flows | Flow library with categories and output action badges | Ctrl+G / Cmd+G |
| Agents | Agents and sub-agents (agent-tools) | Ctrl+Shift+A / Cmd+Shift+A |
Bottom section (actions):
| Icon | Action |
|---|---|
| Toggle sidebar | Collapse or expand the content sidebar (Ctrl+B / Cmd+B) |
| Theme | Cycle between light, dark, and system theme |
| Settings | Open the settings dialog |
Clicking any view icon auto-expands the sidebar if it’s collapsed.
Content sidebar
Section titled “Content sidebar”The panel next to the icon strip. Its contents change based on which icon is active.
Conversations view
Section titled “Conversations view”The default view. Shows all conversations organized into groups.
Three system groups are always present:
| Group | Purpose |
|---|---|
| General | Default destination for new conversations |
| Sparks | Conversations created from the overlay’s Spark tab |
| Flows | Conversations created by Flow executions |
Create custom groups by right-clicking the sidebar. Drag conversations between groups to reorganize. Groups support custom colors and icons.
The search field at the top filters by title and message content. Results update as you type.
Hold Ctrl / Cmd and click to multi-select conversations. Batch actions: group, archive, delete, clear selection.
Prompts view
Section titled “Prompts view”Browse and manage reusable prompt templates. Prompts are organized by category with a favorites section at the top. Search across title, description, content, and tags. Import/export prompts as JSON.
Flows view
Section titled “Flows view”Browse and manage execution pipelines. Flows are organized by category with favorites pinned at the top. Each flow card shows its output action (Copy, Paste, Insert Before, Insert After, Open in Chat) and preview mode. Import/export as JSON.
Agents view
Section titled “Agents view”Create and manage agents and sub-agents (agent-tools). Two sections: Agents (full agents with system prompt, model, and tools) and Sub-Agents (agents that other agents can invoke as tools, with typed input/output schemas). Built-in agents are marked with a badge. Import/export as JSON.
Archive and Trash views
Section titled “Archive and Trash views”Archive holds conversations you want to keep but hide from the main list. Unarchive to restore.
Trash holds deleted conversations. Restore or permanently delete. Empty Trash clears everything.
Tab bar
Section titled “Tab bar”Every open conversation gets a tab. The tab bar sits above the main panel.
- Pin — right-click a tab → Pin. Pinned tabs collapse to icon width and persist across restarts.
- Split view — press Ctrl+\ / Cmd+\ to split the panel. Compare outputs from different models side by side, or reference one conversation while working in another.
- Overflow — when tabs exceed the bar width, an overflow dropdown appears on the right.
- Provider colors — each tab shows a subtle top-border accent color from its model’s provider (e.g. violet for Anthropic, green for OpenAI), so you can identify the provider at a glance.
Main panel
Section titled “Main panel”The center of the interface. Contains the message thread and the chat input at the bottom.
Model bar
Section titled “Model bar”Above the input field. Shows the current provider and model (e.g. “OpenRouter / OpenAI: GPT-5.4”). Click to open the model picker — a two-panel modal with provider list on the left and model details (context window, pricing, capabilities) on the right.
Two toggles sit next to the model name:
- Thinking — enable or disable extended chain-of-thought reasoning. Only appears when the selected model supports it. Blue when active.
- Thinking visibility — show or hide thinking blocks in the message thread. Useful if you want thinking enabled but don’t need to read the reasoning steps.
Chat input
Section titled “Chat input”The text area where you type prompts. Auto-resizes as you type. Supports pasting images, drag-and-drop files and folders, and @ mentions to attach tools.
Below the input, a toolbar with four buttons:
| Button | What it does |
|---|---|
| Context strategy | Choose how conversation history is sent to the model — Auto Compact (default), Last N, First N, All, None, or Token Budget. Highlighted when set to a non-default strategy. |
| Tools | Open the tool picker to enable or disable tools for this conversation. Shows built-in tools, MCP server tools, and agent-tools. Highlighted when tools are enabled. |
| Attach | Add images (for vision), files or folders (for RAG), grab the current Finder/Explorer selection, or pick from clipboard history. Highlighted when files are pending. |
| Prompts | Browse the prompt library. Search, pick a prompt, fill in any placeholder variables, and insert it into the input field. |
The send button (arrow icon) sits on the right. While streaming, it turns into a stop button (square icon) to cancel generation.
Info panel
Section titled “Info panel”A collapsible right-hand panel. Toggle with Ctrl+I / Cmd+I. Three tabs:
| Tab | Contents |
|---|---|
| Config | Agent, model, system prompt, temperature, max tokens, enabled tools, context strategy — edit any field to override defaults for this conversation only |
| Artifacts | Files attached to the conversation — PDFs, images, code, DOCX — with filename, size, and processing status for RAG-indexed documents |
| Info | Conversation metadata: creation date, total messages, cumulative tokens, cumulative cost, models used |
Universal overlay
Section titled “Universal overlay”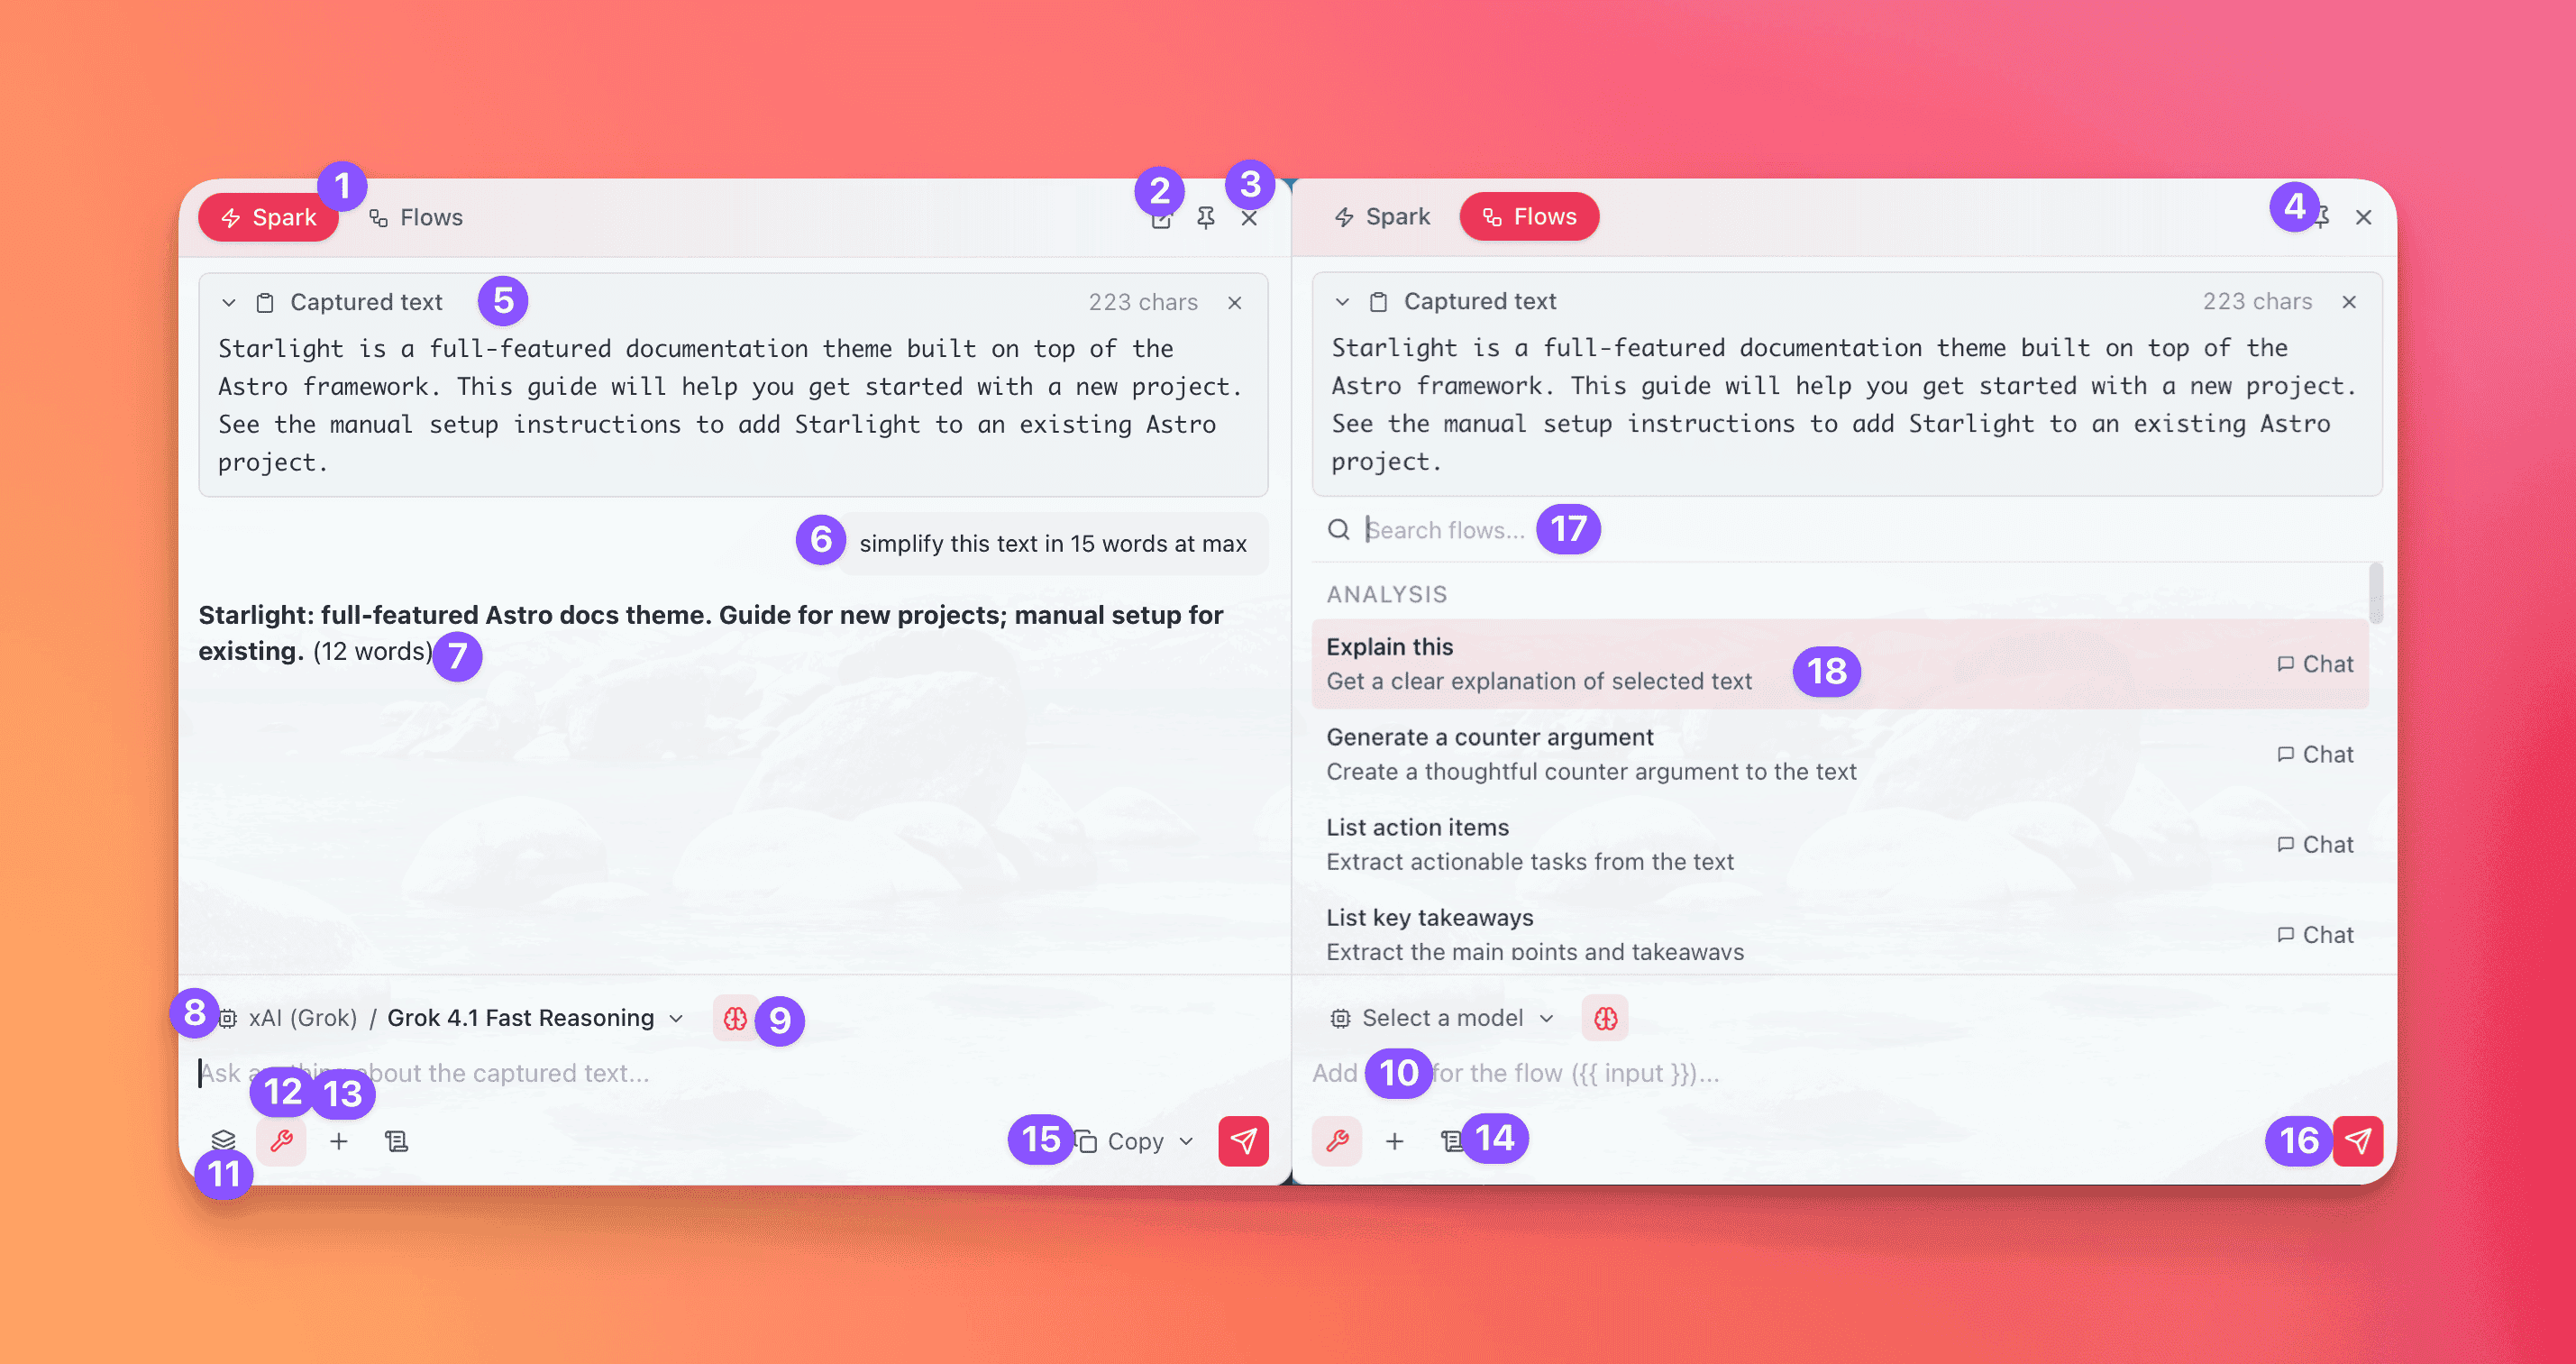
A floating panel summoned from any application with a global hotkey. Default: Ctrl+Alt+Space (Windows/Linux) or Cmd+Option+Space (macOS). Configurable in Settings → Sparks & Flows.
The overlay has two tabs — Spark and Flows — for two independent features that share the same overlay surface.
Sparks
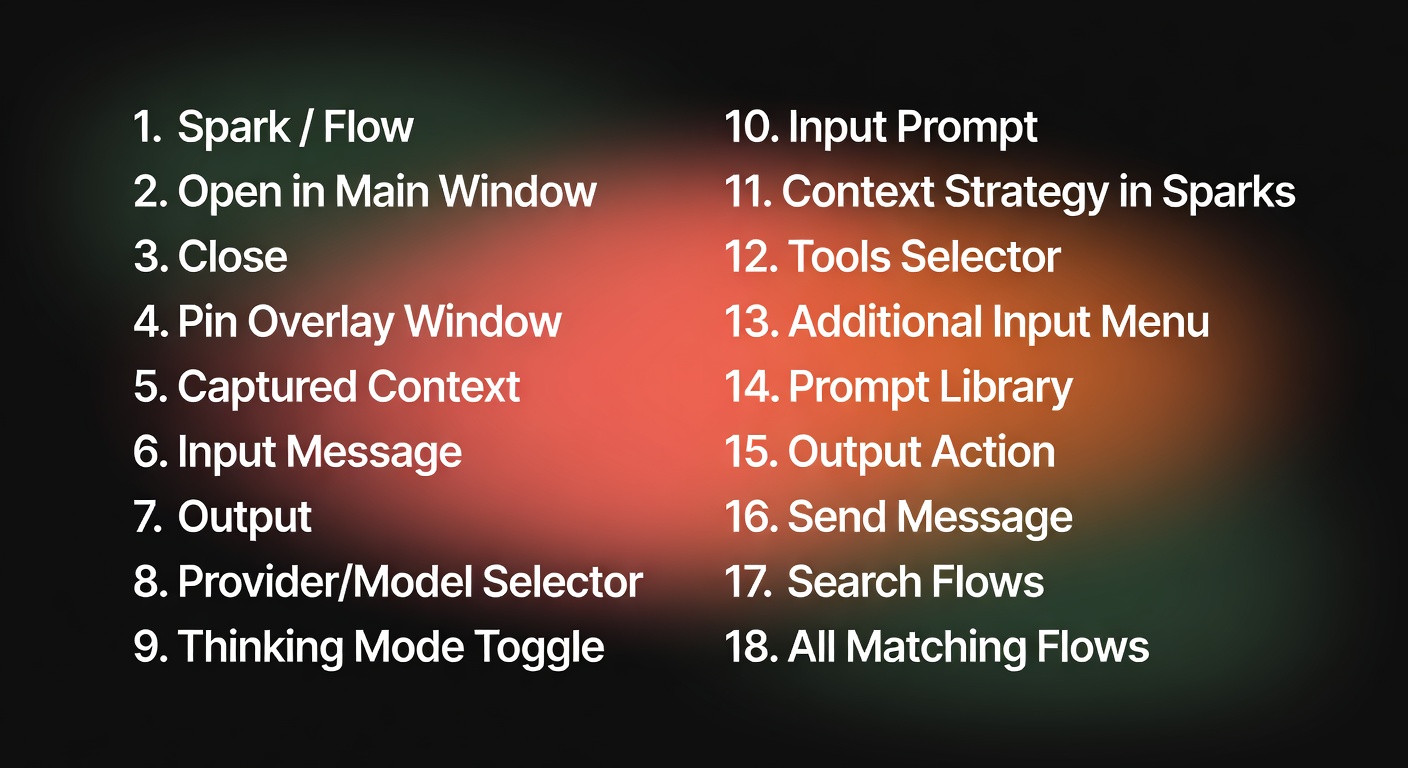
Section titled “Sparks”For quick, direct prompts. Highlight text in any app, press the hotkey, and the selected text appears in a collapsible Captured text block at the top (with character count and a dismiss button). Type a prompt in the input field — or use the captured text as-is — and press Enter. The response streams directly into the overlay.
The Spark input has its own model bar (provider / model picker + thinking toggle) and the same toolbar as the main chat input — tools, attachments, and prompt picker. An output action dropdown on the right lets you choose what happens with the result: Copy to Clipboard (default), Paste at Cursor, Insert Before, Insert After, or Open in Chat.
For running pre-configured execution pipelines against the captured text. Switch to the Flows tab and you get a searchable list of all your flows, grouped by category (Analysis, Writing, Code, etc.). Each flow shows its name, description, and output action badge.
Select a flow and it runs immediately with the captured text as input. The input field placeholder changes to “Add input for the flow…” — you can add extra context before sending.
Overlay controls
Section titled “Overlay controls”- Open in main chat button (external link icon) — transfers the conversation to the main QARK window. If streaming is in progress, it continues seamlessly in the main window.
- Pin button (top right) — keep the overlay open when you click away instead of dismissing on blur.
- Close button (X) — dismiss the overlay.
- Press Esc to dismiss.
Spark conversations are saved to the Sparks system group, Flow conversations to the Flows system group. Both are full QARK conversations — open them from the sidebar to continue, attach files, or switch models.